Grades: 9-12 Author: Rebecca Agapov, AGPA staff Source: Original
Abstract
In this lesson, students will construct a small scale laser table and reflect a laser beam around an object. Students will be exposed to some of the key components of real life laser systems and learn how to control light propagation (control how the light travels around the laser table).
Objectives
What should students know as a result of this lesson?
Students will understand the basics of light propagation and light reflection as a result of this lesson.
What should the students be able to do as a result of this lesson?
Students will be able to use mirrors to reflect light around an object and collect it at some other position.
Students will be able to measure the angles that the light is being reflected out and construct a ray diagram of the light from source to detector.
Students should be able to calculate the angles necessary to direct the light to different positions on the bull's-eye detector.
Materials
6 blocks of wood (approximately 8 centimeters (cm) x 8 cm x 2.5 cm) (size is not that important as long as 4 of the blocks are the same size)
4 mirrors (8 cm x 8 cm squares work well, circular mirrors that are 8 cm in diameter may also be used) that can be purchased at a craft store
Double-sided tape
Handheld laser pointer; red is lower energy and power, but green can also be used
One 2 L bottle of soda (a bottle of soda is suggested, but any non-reflective (not shiny) object that is taller than the blocks may be used)
Black sheet of paper with white colored pencil or crayon to write on black paper
Procedures
Engagement
Cutting-Edge Research: Dr. Mark Foster talks about his polymer surfaces and interfaces research involving nano, biomedical applications, computer displays, and military applications.
Tell the students that unknown substances can be identified using lasers by shining the light on or through the sample and observing the light that scatters (bounces) off of the sample. The light that scatters may not be strong enough in intensity for us to see with our eye, but can be seen with special detectors. We will use a bull's-eye target as a detector for the experiment today.
Assessment: Monitor that students are watching the video and engaged.
Exploration
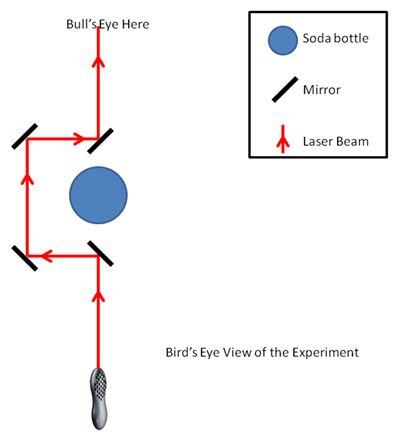
The point of this experiment is to position a beam of propagating light around some object and hit a detector which is represented by the bull's-eye. By repositioning the mirrors, the light can get closer to the center of the bull's-eye.
Before starting the Exploration, stress to the students that they should not point the lasers at each other and they should never look directly into the laser beam. This can result in serious irreversible eye damage.
Draw a small circle (approximately 8 cm in diameter) on the center of the black sheet of paper. This will be the center of the bull's-eye detector. Draw a circle with a slightly larger diameter outside of the first circle. The black sheet of paper should look like it has a target on it.
Tape the black sheet of paper to a wood block so that it stands upright (perpendicular to the lab table).
Using double-sided tape, attach one mirror to each of the four blocks. Put the mirrors on the largest face of the block. Make sure that the mirrors are all flat against the blocks and all mirrors are at approximately the same height from the table.
Lay the fifth block with its largest side face-down on the table and place the laser pointer on this block.
Place the 2L of soda (or the object of choice) 30 cm in front of the laser pointer. Put the target 30 cm on the other side of the soda bottom. (The three things should make a straight line, with the soda bottle in between the laser pointer and the bull's-eye.)
Turn on the laser beam. To keep the laser turned on while realigning the mirrors, put a piece of tape across the "on" button.
Position two of the blocks with the mirrors taped to them so that the laser beam does not hit the soda bottle but instead goes around it.
Position the last two blocks so that the laser beam now strikes the target that was drawn on the black sheet of paper.
Sketch a diagram of the setup in your lab notebook. Note where the mirrors, laser, and soda bottle are positioned. Also, note where the laser beam strikes the target.
Assessment:
Have the students answer the following questions after completing the experiment:
Is there a way to reposition the mirrors to strike the target in a different spot?
How many times did you have to reposition the mirrors to get the laser beam to hit the bull's eye at the center of the target?
What could you do to improve the design of your experiment? (Answers here could include better mirrors (flatter); more precise mounting to the blocks; attaching the blocks to the table with screws or glue so that they do not shake or get bumped; a larger target); etc.)
(Advanced): What angles do the mirrors need to be at to go around the soda bottle and hit the target? (Initially: Each mirror would be at a 45° angle ideally. The main point is that the light will be reflected at the same angle as it strikes the mirror. This is known as the "law of reflection" and is explained in the supplementary information found on the websites listed below.)
(Advanced): What angles do the mirrors need to be at to go around the soda bottle and hit the target if the laser is moved 15 cm to the left? What angles do you need if your target moves 15 cm to the right? (Answers here depend on the exact placement of the pieces. The angles can be calculated with a compass, calculator, and some graph paper.)
Explanation
Have the students report their findings on the following:
How close their laser beam was to the bull's-eye?
How many times did they have to reposition the mirrors?
Explain that this is an important experiment to learn not only how light propagates (travels) but also about accuracy, which is essential to scientific work.
Assessment: Monitor that students are participating in the discussion and understanding the concepts presented.
Elaboration
The students can tie this experiment into what they are learning in their geometry class.
Using a piece of paper and a compass, have the students draw how the light reflects knowing that the light will reflect at the same angle as it strikes the mirror. The students can measure the angles needed to position the mirrors to strike the target and compare with their calculations on the paper.
The students should also be able to reposition the mirrors (on paper and in the experiment) if the target is moved 15 cm left or right of its initial position or if one of the mirrors is removed. (This exercise of drawing a diagram of where the laser beam will go is an important exercise that everyone that works with optics does before setting up their experiment.)
Assessment: Check that the student's angles are correct.
Prerequisites
Basic geometry (for elaboration exercise)
Best Teaching Practices
Real-life Situations and Problem Solving
Alignment with Standards
National Standards:
9-12 Physical Science
9-12 Science as Inquiry
Ohio Standards:
9-12 Physical Science
9-12 Science as Inquiry
Content Knowledge
The following websites provide information on lasers:
Never look directly into the laser beam. It can cause serious irreversible eye damage.
Applications
Lasers and optics are used in DVD and CD players, barcode scanners, precision measurements, science equipment, and precision surgery. Lasers are also currently being studied by BMW for use as headlights and by the government for laser-based weaponry, like in the Stars Wars™ movies.
Assessment
Assessments are completed during each step of the Learning Cycle. For an authentic assessment, students can be asked to research lasers online and create short presentations.
Other Considerations
Grouping Suggestions:
Ideally, students should work in groups of 2. However, due to the amount of supplies that are necessary, groups of 3 or 4 should be fine. Have all students sketch the setup of the laser table in their lab notebooks.