Stretch Your Students' Imaginations - Rubber Band Contest
Grades: 5-8 Author: Dr. Carin A. Helfer Source: Original
Abstract
Students will explore the properties of polymers using a poly putty made from glue and borax. Physical and chemical changes, conservation of energy, and kinetic friction will be explained. An extension of the lesson allows the students a fun opportunity to enter the AGPA Rubber Band Contest for Young Inventors. The entire lesson allows teachers to meet science content standards and introduce polymers and science concepts using the Best Teaching Practices Hands-On/Minds-On Learning and Authentic Problem-Based Learning.
Objectives
What should students know as a result of this lesson?
Students will know some properties of polymers, including rubber elasticity, polymer flow, high coefficient of friction
Students will know the difference between physical and chemical changes
Students will know what kinetic energy, gravitational potential energy, and elastic potential energy are
Students will know that energy can be transformed or transferred but is never lost (Conservation of Energy)
Students will know that kinetic friction is a force that occurs when two objects in contact interact by sliding past one another
What should the students be able to do as a result of this lesson?
Students will be able to identify the difference between physical and chemical changes
Students will be able to identify kinetic energy, gravitational potential energy, and elastic potential energy
Materials
Elmer's white glue bottles
2 large plastic cups - one for glue & water, one for borax & water
Water
Craft sticks
Powder borax
Graduated cylinders for measuring liquids
Small plastic cup
Plastic spoons
Food coloring, if desired
Procedures
Engagement
In advance of class, make a batch of the poly putty at 60% glue concentration (see Table in Exploration section). For a video on making poly putty, see below:
At the beginning of class, show the students the poly putty. Ask the students if they had previously made or seen glue putty. If so, ask them to describe this material. Write their comments on the board.
Next, make a ball with the putty and ask the students what they expect will happen when you drop the ball a set height from the table. Drop the ball to determine if it meets their expectations.
Explain to the students that you made the poly putty with 60% glue and 40% water. The concept of concentration will need to be explained at the appropriate level for the age of your students. Ask the students, "What do you expect will happen if the glue concentration is 75%? What will happen if the glue concentration is 50%?" Write their guesses on the board.
Tell the students that they will work in groups to make poly putties of different glue concentrations to investigate the materials' properties.
Assessment: The assessment is informal at this stage. The students should all be involved in the discussion.
Exploration
Students can be placed in groups of 2, 3, or 4, whichever works best for your class.
Pass out worksheets to each student.
Assign each group a sample number that determines the concentration of glue as given in the table below.
Measuring the glue and glue dilution:
For measuring the glue, it is best to use a small plastic cup that has been marked for 42 ml. First, use the graduated cylinder to measure 42 ml of water. Transfer water into the small plastic cup and mark with a permanent marker a line at the level of 42 ml. Dump out the water after marking the cup.
Use the marked cup (with line for 42 ml) to measure the glue. Dump the 42 ml of glue into a large plastic cup.
Measure the necessary amount of water for your sample choice in the graduated cylinder and add this water to the glue in the large plastic cup. Stir with craft stick.
Food coloring can be added to the glue and water. A drop or two is sufficient.
Have the students record the selected concentration on the worksheet.
Have the students record observations of glue and water on the worksheet.
Have the students answer the question regarding physical or chemical change on the worksheet.
Note: the different concentration of glue will result in poly putties with different final properties.
Making the borax solution:
Fill the plastic cup for the borax solution with 120 ml (approximately 1/2 cup) of warm water.
Add 5 grams (approximately one teaspoon) of borax powder to the water. Stir with a spoon until nearly all of the borax powder is dissolved. Note that some borax will remain out of solution.
Making the Poly Putty:
Have the students use the measurements in the table below to determine the amount of the borax solution to add to the glue and water solution.
Using a graduated cylinder, measure and add the appropriate amount of borax solution to the cup filled with glue and water.
Stir the mixture until it reaches a point that it can be removed from the cup and kneaded.
Have the students answer the question regarding physical or chemical change on the worksheet.
Have the students describe the properties of the poly putty on the worksheet.
Have the groups break their poly putty into two pieces and trade one piece of their poly putty with another group to examine a poly putty made with a different concentration of glue. You should have the trades pre-determined so that each group will have a concentration that differs from their original concentration.
Have the students compare the properties of the poly putty that they made with the properties of the poly putty made with a different concentration of glue on the worksheet.
Assessment: See that students are following proper laboratory procedures. Monitor the groups and make sure they are recording all their observations and data.
Explanation
As a class review/discuss the worksheet.
Water added to the glue is a physical change. The water can be evaporated to return to the glue, if desired.
Borax added to the water is a physical change. The water can be evaporated to return to the borax powder.
Adding the borax solution to the glue and water is a chemical change. A crosslinked network forms with hydrogen bonds being formed.
Physical change: A new substance is not created, only the form of the substance is changed. Physical changes can be reversed.
Chemical change: A chemical reaction occurs and a new substance is formed. Chemical changes cannot be easily reversed. Energy is either given off or absorbed during the process. See: http://www.ric.edu/faculty/ptiskus/chemical/ for additional information.
Conservation of Energy: Remind the students of the beginning of the lesson when you dropped the ball of poly putty on the table. Use this event to discuss the conservation of energy: the gravitational potential energy was converted to kinetic energy. Gravitational potential energy is the energy that an object possesses because of its position in a gravitational field. Kinetic energy is the energy of an object because of motion.
For older students, the elastic potential energy is the potential energy that an object possesses because of its deformation. When a rubber ball is dropped, the gravitational potential energy converts to kinetic energy, as mentioned above. The ball bounces back up because on impact the kinetic energy converts to elastic potential energy as the ball compresses. This elastic potential energy then converts into kinetic energy. The ball does not return to its original height because as the ball compresses, some energy is lost to thermal energy.
For #4 and #5 of the worksheet, the students will have various properties of the poly putty to share. Polymers are quite unique materials. The AGPA's "What are Polymers?" multimedia presentation at What are Polymers? is a good introduction to polymer materials.
Rubber elasticity - the ability to undergo large deformations of the material and completely recover (think of a rubber band).
Polymer flow - the students should have observed that when a ball of putty is set on the table, over time the ball will flatten as the chains slide past each other under the force of gravity.
High coefficient of friction - The students may not have thought about friction when observing the poly putty. If the students did not mention this property in your discussion, ask them if the putty is easily slid on the desktop. Discuss why many sports shoes have rubber soles. Kinetic friction is a force that occurs when two objects in contact interact by sliding past one another.
Assessment: An informal assessment can be done, such as an oral review of the concepts presented. Alternatively, or in addition, a traditional assessment, such as a short quiz, can be done to determine if the students understand the concepts presented.
Elaboration
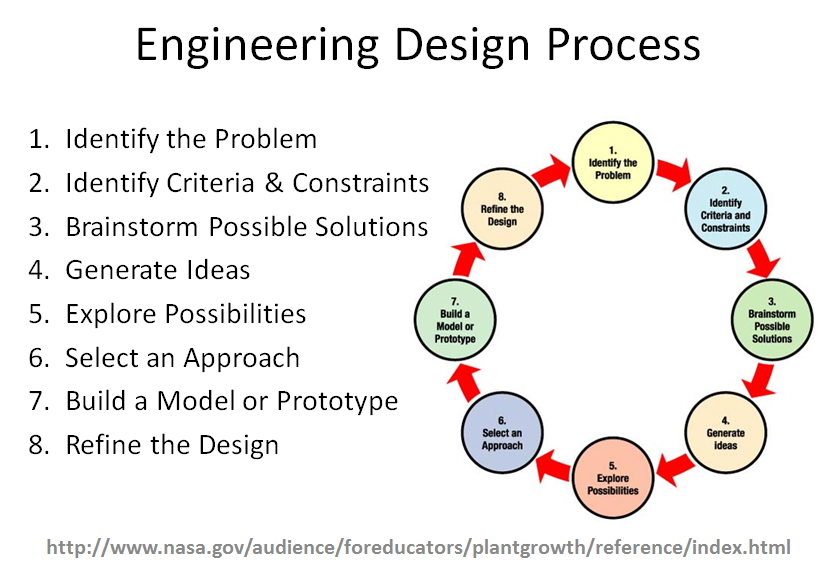
As a final project, have the students create an invention to enter in the AGPA Rubber Band Contest for Young Inventors. See http://rubberbandcontest.org/ for Official Rules and Entry Form.
Entries entered in the Science & Engineering Division will challenge the students to do engineering design. The Engineering Design process differs from the Scientific Method and includes the following steps:
Assessment: A rubric is included for grading the students' inventions and essays. The students can also give oral presentations to explain their inventions to the class.
Prerequisites
Students need to know how to use a graduated cylinder. See:
MS-PS1-1 Develop models to describe the atomic compostion of simple molecules and extended structures.
MS-PS1-3 Gather and make sense of information to describe that synthetic materials come from natural resources and impact society.
MS-PS2-1 Apply Newton's Third Law to design a solution to a problem involving the motion of two colliding objects.
MS-PS2-2 Plan an investigation to provide evidence that the change in an object's motion depends on the sum of the forces on the object and the mass of the object.
MS-PS3-1 Construct and interpret graphical displays of data to describe the relationships of kinetic energy to the mass of an object and to the speed of an object.
MS-PS3-5 Construct, use and present arguments to support the claim that when the kinetic energy of an object changes, energy is transferred to or from the object.
MS-ETS1-1 Define the criteria and constraints of a design problem with sufficient precision to ensure a successful solution,taking into account relevant scientific principles and potenitial impacts on people and the natural environment that may limit possible solutions.
MS-ETS1-2 Evaluate competing design solutions using a systematic process to determine how well they meet the criteria and constraints of the problem.
MS-ETS1-3 Analyze data from tests to determine similarities and differences among several design solutions to identify the best characteristics of each that can be combined into a new solution to better meet the criteria for success.
MS-ETS1-4 Develop a model to generate data for iterative testing and modification of a proposed object, tool, or process such that an optimal design can be achieved.
Common Core Standards:
RST.6-8.1 Cite specific textual evidence to support analysis of science and technical texts.
RST.6-8.3 Follow precisely a multistep procedure when carrying our experiments, taking measurements, or performing technical tasks.
WHST.6-8.2 Write informative/explanatory texts, including the narration of historical events, scientific procedures/experiments, or technical processes.
National Standards:
Science as Inquiry, Content Standard A, Grades 5-8
Physical Science, Content Standard B, Properties and changes of properties in matter, Grades 5-8
Physical Science, Content Standard B, Motions and Forces, Grades 5-8
Physical Science, Content Standard B, Transfer of Energy, Grades 5-8
Ohio Standards:
Ohio Academic Content Standards for Science:
Grade 5 - Scientific Inquiry, Benchmark A, Doing Scientific Inquiry
Grade 6 - Physical Sciences, Benchmark A, Nature of Matter; Science & Technology, Benchmark B, Abilities to Do Technological Design; Scientific Inquiry, Benchmark A, Doing Scientific Inquiry
Grade 7 - Physical Sciences, Benchmark D, Nature of Energy; Science & Technology, Benchmark B, Abilities to Do Technological Design; Scientific Inquiry, Benchmark A, Doing Scientific Inquiry
Grade 8 - Physical Sciences, Benchmark B, Forces and Motion; Science & Technology, Benchmark B, Abilities to Do Technological Design; Scientific Inquiry, Benchmark A: Doing Scientific Inquiry
Ohio Revised Science Education Standards and Model Curriculum:
Grade 5 - Physical Science, Topic: Light, Sound, and Motion: Gravitational Force; All students will use scientific processes to construct their knowledge and understanding in all science content areas; Technological and Engineering Design
Grade 6 - Physical Science, Topic: Matter and Motion: kinetic energy and potential energy; All students will use scientific processes to construct their knowledge and understanding in all science content areas; Technological and Engineering Design
Grade 7 - Physical Science, Topic: Conservation of Mass and Energy: Energy can be transformed or transferred but is never lost; All students will use scientific processes to construct their knowledge and understanding in all science content areas; Technological and Engineering Design
Grade 8 - Physical Science, Topic: Forces and Motion: Friction, gravitational potential energy, elastic potential energy; All students will use scientific processes to construct their knowledge and understanding in all science content areas; Technological and Engineering Design
Content Knowledge
Content knowledge added into Learning Cycle as appropriate. Additional basic polymer information can be found at The Macrogalleria, a Cyberwonderland of Polymer Fun: http://www.pslc.ws/macrog/maindir.htm
Safety
General classroom safety rules should be followed.
Safety goggles should be worn when making the poly putty.
Students with sensitive skin may want to avoid handling the poly putty.
Poly putty should not be ingested.
Do not get poly putty on carpet or clothing.
Poly putty will keep in sealed, plastic bags. However, mold will begin to grow over time. It can be left out for the water to evaporate and will dry into a hard plastic.
Poly putty can be thrown away in the trash. Do not put down sink drains.
Care should be taken when working with rubber bands and other materials to create inventions.
Applications
Polymer materials, both naturally occurring and man-made (synthetic), are very significant to our everyday lives. Therefore, understanding these unique materials and their properties is important.
Friction is a science concept that we encounter every day.
Assessment
Using the Internet or library resources, have students research an item that did not exist 50 years ago. Have the students should report to the class the benefits to society of this invention and possible disadvantages because of the invention.
Other Considerations
Grouping Suggestions: Ideally, small groups of students are preferable to allow the students more hands-on experience. However, the students can be placed in groups of 2, 3, or 4, depending on what works best for your class.
Pacing/Suggested Time: 45 minutes for Engagement, Exploration, and Explanation. If the students will work on their rubber band inventions in class, multiple 45-minute class periods will be necessary.