Grades: 5-8
Author: Sandy Van Natta
Source: Original
In sports, participants may be subjected to collisions with balls or other people or even crashes on bikes and skateboards. How is it possible for athletes to tolerate such blows and still "remain in the game"? This activity allows students to use inquiry to investigate the materials used to make sports helmets, a modern form of body armor. The students will perform impact tests on plastic (polymer) samples by dropping a plumb bob from differing heights onto the samples. The tests, modeled after actual industrial testing methods, will measure the brittleness of a material that has been subjected to an intense blow. Both "hard" plastics that may be used in the outer shell of a helmet and foamed plastics that can be used for the inner lining of the helmet will be tested. The students will use data gained from their tests to determine which plastics they feel are most suitable for usage in a helmet.
A discussion of the use of science and technology to aid and protect humans will flow from this lesson. As students examine and determine the properties of various materials, they will be mimicking the scientific and technological processes involved in designing a consumer product for market.
Throughout this lesson, best teaching practices are emphasized. Inquiry and hands on/minds on techniques are used in conjunction with the learning cycle to show the ties between science and technology.
What should students know as a result of this lesson?
What should the students be able to do as a result of this lesson?
*Plastic samples can be cut from the sides of detergent bottles (polyethylene). Lids from plastic food jars are often polypropylene. Pieces of polycarbonate (Lexan) can be obtained from scrap "piles" at glass shops. Plexiglass can be bought at any hardware store. Other plastic samples can be obtained from local stores that specialize in plastics. Sheets of high density polyethylene, ultra high molecular weight polyethylene, Lexan, and polypropylene can be purchased from Universal Plastics. Contact Tim Smathers at 330-645-6873. A 2 ft x 2 ft square of 1/8" plastic ranged from $4.45 to $9.60. E and T Plastics (1-800-383-7753) has ABS as well HDPE, UHWWPE, and others but 4 x 8 foot pieces must be purchased. This company will cut the pieces to any size.
**Clear tube is available at hardware stores. Look for tubing made to cover fluorescent lights. It comes in 4 ft and 8 ft lengths and is inexpensive. Various foam or padding materials such as styrofoam, foam rubber, polyurethane foam, bubble wrap, rubber, etc. Materials should be of similar thickness. Miniature or regular flat chocolate bars such as Hershey's, Hollow or cream filled chocolate balls, � of a plastic Easter egg or sports ball egg
Dow's Great StuffT insulating foam sealant or other similar variety. Ground up polymer samples from an athletic shoe - rubber samples from the outer sole and foam samples from the mid sole. Samples are inexpensive and available through Nike at www.airtoearth.com. A kit of activities is available with a curriculum guide for $24, or without the guide for $19 (the guide can be downloaded for free). However only the grind is needed for this lab. A grind refill kit is available for $11.
The crosslinked polyethylene foam can be purchased from Nantahala Outdoor Center, 1-800-232-7238. It is their minicell foam (Foam-MF-SX-650) and is $3.50 a square foot.
***Impact Testing Kits and refills can be ordered from: Educational Innovations Inc. www.teachersource.com; 888-912-7474
Impact Testing kit #IMP-100 - includes instructions, string, plumb bob, clear tube, wooden block, plastic collar, and 22 testing materials (2 samples of 6 different hard plastics and 5 different foams)
Impact Testing Refill #IMP-125 - 8 pieces of 6 different hard plastics and 5 foams for a total of 88 testing samples
Engagement
A short video clip showing a football tackle or a fall from a bike or skateboard can be used to catch students' attention and allow you to present the problem. Ask students how they think athletes can withstand tremendous blows and still "remain in the game". After students have determined that protective body equipment is needed to minimize injury, you can tell them the purpose of these activities is to test materials and to determine the best ones to use in protective headgear (helmets).
To make your initial discussion more interesting the following background information is given for your use:
In sports, body armor is designed to protect the participant from projectiles (mainly balls), from human impact, and from crashes. Many sports, such as football, cycling, and baseball require athletes to wear helmets. The outer shell of the helmet must be impact resistant while the interior must mitigate an impact by slowing the deceleration of the head.
The National Operating Committee on Standards for Athletic Equipment (NOCSAE) has developed voluntary test standards designed to reduce head injuries by establishing requirement of impact attenuation for football helmets/face masks, baseball/softball batting helmets, baseballs and softballs, and lacrosse helmets/face masks. The various regulatory bodies for sports, including the NCAA and the National Federation of State High School Associations have adopted these standards.
In football, on the field concussions are considered one of the most serious of contact sports injuries. Concussions are most likely to happen as the result of a blow to the side of the head, rather than the front or top, according to new research conducted by Biokinetics & Associates. Football is responsible for approximately 100,000 concussions in the United States each year.
The NOCSAE test standard for football helmets involves mounting a helmet on a synthetic head model and dropping it a total of 16 times onto a firm rubber pad from a height of 60 inches. Drops are made onto 6 locations on the helmet. Most of the drops are conducted at ambient temperatures, however, at least 2 of the drops are conducted immediately after the exposure of the helmet to 120� F for four hours. The equivalent of a 60-inch drop test would occur if a player running at 17.9 ft/sec (12.2 mph) ran into a flat surface which stopped his head in less than one inch. Most players run faster than this (average speed of a player running 40 yards in 4.8 seconds is 25 ft/sec) but vary rarely would the head be stopped in such a short distance on the football field.
In baseball and softball, the primary hazard is being struck by a pitched or batted ball. Therefore, baseball helmets are mounted on an instrumented headform that is free to move. An air cannon is used to shoot a baseball from close range into the helmeted headform at 60 mph. Impact accelerations are measured and a Severity index is calculated.
Assessment: Assessment is informal at this stage. Try to involve all students in the discussion. Allow students to cite examples from their own experiences relating to the importance of protective body equipment.
Exploration I
Exploration I allows students to test materials that could be used in the outer shell of a football or baseball helmet.
Procedure:
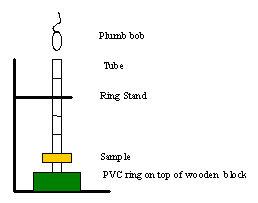
Note: the tube can be held by hand if a ring stand is unavailable. Younger students may want to hold the tube anyway - for a more secure grip.
All Impact Standard testing is done in the English system. Therefore, the English system will be used in this laboratory, too. The unit of measure for the impact test is the inch-pound. If a 10 pound weight is dropped an inch onto the sample, then it equals 10 in-lb. You will be using an 8 oz plumb bob (or 0.5 lb.). The plumb bob will be dropped through a tube from increasing heights onto the plastic sample. If you would prefer to use metrics, you can compute impact in Newton-meters.
Assessment: Make sure students are following proper laboratory procedures. Monitor the groups and make sure they are recording information on their worksheets.
Explanation I
After completion of testing and recording of data, students should report their findings and determine the most suitable materials for use in a particular type of helmet, of the ones tested, based on their results. There are no wrong answers here as long as students can back up their statements using evidence from their data.
Ask students to explain impact resistance and its importance in determining materials to be used in the outer shell of a helmet. Make sure they know that impact resistance describes how a material reacts to a shock or sudden stress. This test measures the brittleness of a material that has been subjected to an intense blow. The property of toughness describes the material's ability to withstand such an impact.
To relate student testing to product development in industry let students know that most product engineers do not use the results from impact tests alone to determine which material will be used in a commercial product. Decisions may also involve information gathered from tests such as stress/strain, tensile strength, ductility, or thermal sensitivity. However, this lab concentrates on the impact resistance of polymers that could be used in constructing sports equipment.
One test used in industry is the Gardner Impact Test. During this test, a weight is dropped from a specified height onto a test sample until it breaks. Although the sample may be any size, industry typically uses a 3 x 5-inch sample with a 1/16 to 1/4 inch thickness. (Since a teacher needs to use whatever materials are readily available, sizes in this lab may vary. It is suggested that samples should be as reasonably close in size as possible.)
Temperature is a major variable during testing. Most industrial tests are conducted at 20� C. These tests will be conducted at room temperature.
The discussion in this section can now lead to the importance of the foam linings placed inside of helmets. This leads you into Exploration 2.
Assessment: Collect and evaluate student worksheets for completeness and accuracy.
Exploration II
Exploration II allows students to investigate the properties of various polymeric materials which could be used in the interior of a helmet. Testing will be used to assess a material's ability to protect an object (such as a head!). Weights will be dropped on various foam materials placed over a "fragile" candy bar. Students will be able to determine which materials offer the best impact attenuation and even be able to design their own materials for testing.
Procedure:
Variation: The candy bars can be frozen. If so, they will show even more damage resulting from the drop. Allow students to suggest and try their own testing procedures if reasonable.

Extension (Optional)
Design your own protective packing material. Mix various combinations of ground up foam and rubber with a small amount of white glue. Two sample recipes are provided.
You can also fill the muffin tin cups with foam sealants from spray cans such as Dow's Great StuffT insulating foam sealant. Great StuffT can also be sprayed directly onto wax paper.
Repeat the drop tests using the new packing materials and compare results.
Assessment: Make sure students are following proper laboratory procedures. Monitor the groups and make sure they are recording information on their worksheets.
Explanation II
Have students report their findings. This can lead to a discussion on different types of helmets and the use of rigid foam in some and soft foam in others. Again, any student answer is acceptable as long as it can be supported by data.
Helmets work by bringing the head (and brain) to a relatively gradual stop upon impact. When an unprotected head strikes against a hard surface, inertia causes the brain to slam forward against the skull. This causes bruising and bleeding.
If you look inside most helmets you will see foam pads. The foam softens the shock by gradually crushing to absorb impact energy, thus cushioning the blow. This slows the stopping process from about 1 millisecond to 6 milliseconds, thus reducing the spike of energy to the head and brain. As the foam crushes or deforms, it converts some of the crash energy into heat.
According to the Law of Conservation of Energy, energy is not lost but converted to some other form of energy. What a helmet does during a crash is referred to as "energy management". Some of the energy of the collision is converted to heat.
Current helmets perform energy management with some type of foam. There are two types of foam: one type is stiff and crushable, the other is rubbery or squishy. Their characteristics make it possible to design a helmet for one very hard impact, a number of hard impacts, or a very large number of softer impacts. Denser foams resist very hard impacts. Softer foams compress more easily in lesser impacts giving better protection against milder injuries. Crushable foams are ideal for helmets designed for one hard impact (like bike helmets). When the foam crushes, it does not bounce back like a spring to make the impact worse. Rubbery foams (football and skateboard helmets) provide multiple impact protection but are less protective in very hard impacts.
Assessment: Collect and evaluate student worksheets for completeness and accuracy.
Elaboration
You may choose to present information on the actual plastics used in various helmet types or have students research this information on the Internet. Students might try to hypothesize why one material is favored for football helmets and others for baseball or biking helmets. Encourage students to suggest and try their own testing methods on the plastics.
Assessment: Have students write a short report on their findings. This report can be collected and evaluated or given orally to the class.
N/A
NGSS Standards:
Common Core Standards:
National Standards:
Ohio Standards:
Information on types of helmets, current testing standards used on athletic equipment, and current industrial tests used on equipment is given in the Explanation sections of this activity. Students need only to be able to read a ruler and perform simple math calculations.
After completing this activity, students should know how important product testing is in determining the use of a material in a consumer product. Even the simplest objects may have hours of testing and design involved before they can be brought to the market.
Resources used:
Goggles should be worn during experimentation. Perform the tests on the center of your work table or desk to minimize the chance of the weight falling on your foot. Younger students may wish to set the apparatus directly on the floor. Since some plastic samples may break, the person holding the tube may wish to wear gloves. Closed-toed shoes are recommended. If a spray foam sealant is used, use the can in a well-ventilated area and follow all safety precautions on the can.
Impact testing is a common industrial procedure. Any material which must sustain a blow will be tested from sports equipment, to car parts, to construction materials. A plastic is chosen for use in a particular product by its physical properties as well as cost. Industry will use the product that best suits a manufacturer's specifications while maintaining a reasonable cost.
Have the students design a miniature helmet using the knowledge they have gained during their testing. Each student can be given half of a plastic egg shell or half of a plastic sports ball shell (sports ball shells are available and in the same general store location as the eggs at holiday time) to be used as the outer shell of a helmet. Ask each student to design and make a lining for their "helmet". The helmet must protect a round hollow or cream filled chocolate ball during an impact test drop of 30 inches.
Each participant can be given their helmet shell to take home and line with whatever shock absorbing material they choose. Helmets can be brought back to the group for testing at a future date if possible. You may want to give small prizes for any helmet which protects the chocolate ball during the impact test. The "survival" of the chocolate ball can be used as the assessment.
Grouping Suggestions: Be aware of students' abilities and ethnic backgrounds when choosing groups. Try to place students of varied abilities and backgrounds in each group. For this particular activity, it may be helpful to place a student actively involved in sports, and who regularly wears a helmet, in as many groups as possible.
Pacing/Suggested Time: The Engagement through both Explanation sections can be completed in two 45 minutes periods. Students can complete most of the final assessment (designing their own helmet ling) at home. It will take at least 15 to 30 minutes to test the student helmets in class after completion depending on the amount of discussion generated during the testing.