
Grades: 5-8
Author: Sandra Van Natta
Source: Hall, Sue; Harris, Mary; Knipp, Rebecca; and Van Natta, Sandra; Industrial Processes of Polymers: How Are Toys Made? A Workshop for Elementary and Middle Level Teachers, The Polymer Ambassadors, 2003
Students explore the ties between science and technology as they simulate the plastic manufacturing processes of extrusion, injection molding and blow molding. Interest is stimulated, and questions are initiated, as students examine a variety of simple plastic toys. Students try to find traits that would lead them to suggest a process by which a given toy was made. Next, students form "manufacturing companies" and actually extrude a product using a common toy - the Play-Doh Fun Factory�. Students also make an injection molded product using a hot glue gun, and a blow molded product using plastic tubing and a simple mold. Finally, students review their original set of toys and classify them as injected, extruded, or blow molded.
What should students know as a result of this lesson?
What should the students be able to do as a result of this lesson?
The kit of party favor toys for each group in the Engage and Elaboration phases can include one item from each of the following (Prices are from July, 2009):
Sherman Specialty Co., Inc. shermanspecialty.com
Oriental Trading Co., Inc. orientaltrading.com
Note: Toys on the market can change. This is a list of some inexpensive toys that are currently available.
Materials for the Exploration through Explanation phases:
Procedures: A recipe for the homemade dough, Klay-Doh, that works well for eight batches of klay or four factories:
Combine the water and baking soda in a large saucepan and bring to a boil. There will be bubbles when the mixture gets warm and carbon dioxide is given off. Do not let it boil over! Bring to a boil and remove from the heat. Add the cornstarch all at once and stir vigorously until all lumps are gone. Cool and then add 2 teaspoons of oil kneading 3-5 minutes while it is warm. Separate into eight equal sized masses, add a drop of food coloring to each lump, and knead in the coloring. Let these sit overnight with a towel over the container. It is ready for student use the next day. Note: The hot mixture will be quite soft. Do not put it back on the heat and stir because it will get too stiff. The extruded objects dry in about two days and shrink in length by .5 to .9 cm.
Assemble a bag of party favor toys for each group. Suggested toys are given in the list above but, numerous simple toys can be selected from toy catalogs. Toys should be inexpensive and can often be bought in bulk. Make sure you have some blow molded toys (hollow), injected toys (solid), and extruded toys (long, continuous, solid shapes that can be cut into sections). Note: cookie presses, meat grinders, and toothpaste tubes are all extruders. They produce long, continuous shapes.)
Practice the blow molding process yourself before your session. It takes several tries to make a reasonably shaped object.
Engagement
This phase is designed to stimulate interest and initiate questions about industrial processes needed to make simple toys.
Hand one party favor toy to each small group of students. Let them work in groups to discuss how they think a particular toy is made. Do not give any answers such as "maybe they are hollow or press..." Let them think and observe. Have groups trade and examine toys until they have had time to view all the toys. Ask the students to classify the toys into groups based upon their discussions. Collect all toys at the end of the class period.
Assessment: A class discussion is appropriate and students may or may not agree on how they think a particular toy is made. Listen to the student's observations and methods of classification and accept all ideas at this time. Let the students group toys. Take some notes or have the students take notes on their decisions. This part of the learning cycle produces lots of questions and frustration. Students are begging for answers. Encourage all members of the class to join in the discussion.
Exploration
The Exploration phase has three activities. Student worksheets for each can be found in the worksheets section of this plan.
Part 1:
In the first part of this phase, the student groups will simulate the industrial process of extrusion and produce a product that is acceptable to a customer (another group).
Each group should be made up of four participants. You may assign the groups or use a deck of playing cards to assign roles to the student groups. If cards are used, the "kings" are a group and the holder of the "heart card" is the factory manager in charge of production, waste and total mass, the "club card" holder is in charge of quality control or making sure the final product fits the specifications stated by the customer and writes the letter at the conclusion of the activity, the "diamond card" holder is the packaging manager or in charge of getting the product ready for shipment, and the "spade card" holder is the factory technician who runs the factory and keeps the working area clean and tidy.
Each group is given a customer order and the mass of the raw materials they will be using. Each order should emphasize that the customer is interested in a uniform product with smooth edges and no color mixing. Each group is then given a Play-Doh� Fun Factory, customer order form, and 2 colors of Play-Doh� (see attached worksheet). The groups then try to manufacture an extruded product to match the customer's specifications. Products can be massed and the waste (material let behind in the factory) calculated. If a price is assigned to the amount of Play-Doh� given, product cost and waste loss can be calculated.
An Example of a Customer Order Form (Note: Sample order forms can be found in the worksheet section.)
Waste is a problem with every industry, and so to address this problem, give each team a specific mass of dough of each color. At the end of the production, teams can mass their product and the left over dough. No multicolored dough can be returned for reuse and is considered waste. If a cost is assigned to a given amount of dough, students can calculate the cost of the materials needed to produce a given item as well as the cost of "waste" materials.
A team of four students also needs access to various types of packaging materials. The product can be packaged in simple materials (bubble wrap, cardboard, etc.) and "shipped" to the next group for examination and acceptance. Once a product is produced, the packaging manager determines the type of packaging material that is to be used. Recycled materials for packaging are encouraged! At this point, it is possible to spend more time working with students on the concepts of source reduction in packaging. Extra credit points could be assigned for creative use of packaging materials while keeping the volume or mass to a minimum. The package must insure a safe delivery to the customer while at the same time take into account the weight, size, and cost of the shipping materials. A customer order must be included in the package as well as the leftover dough. A bill for the finished product, determined by the team, is also included in the package. When all packages have been prepared for shipment, the teacher or class, may decide to drop each package from a given height to simulate "handling" of the packages during shipment. (I would just have the teacher do the delivery.)
Once packages are "shipped" to the customer, another student group opens the package with the customer order inside and rates the product on the grading card. The students do the assessment of this activity. Each group evaluates the product they have received according to a rubric. Encourage groups to discuss the properties of the products they have just received. Make sure they note the characteristics of an extruded object.
The students who represent the customer and are doing the rating (see Grading Card Checklist in worksheet link) will have to write a letter to the industry and explain any problems if they feel they cannot accept the product at this time. The alternative is to accept the shipment and enclose a "check" for the product with the letter. A customer cannot send a check for a partial shipment, it is either accepted in total or not accepted. If parts are damaged, it is up to the customer to determine how usable they are for their purposes.
Part 2:
Procedure for injection molding: (see attached worksheet).
Place an oiled wire upright in the mold as the glue cools to produce a small hole in the item when the injected shape is removed. Placing a small loop of jewelry wire in the mold as the glue cools produces a permanent hook or loop.
Part 3:
Finally, the process of blow molding can be simulated through a demonstration or hands-on activity if time allows. You will need to have small, 2 sided molds, with an opening in the base for the tubing. Play-Doh� constantly changes the molds available on the market. The Fingles molds mentioned in the Materials section are no longer available in stores but may be found on eBay. However, look at the Play-Doh� sets currently for sale and you will find molds of various characters or objects. If no molds can be found, a small glass bottle can be used for molding. For bottle use, crimp the heated tubing together at one end and insert the hot tubing into the bottle. Blow gently to inflate the tubing. Once cooled, the blown tubing will have to be twisted and pulled out of the bottle. Follow directions below if a mold is used. Make sure you practice the molding process yourself. It takes several tries to get a good product. Here's where we need an animation or video.
Procedure for blow molding: (see attached worksheet).
Variations:
Numerous other molds can be used during the blow molding process. The heated tubing can be inflated inside a small glass bottle with a wide neck or even "free blown" without any mold at all, once the end has been pinched shut. Students may find other molds to try, especially among their numerous toys. If heat guns and tubing are unavailable or inappropriate for the grade levels of your students bubble tubes can be purchased from Oriental Trading. A bubble tube set consists of a straw and tube of plastic resin. A small bead of the soft plastic resin is placed on one end of the straw. The students can blow trough the straw to inflate the plastic into a permanent but very fragile bubble. (Do not inhale the acetone fumes!) The bubble can be pinched from the straw and will remain inflated for at least a short period. A teacher may even wish to simulate blow molding by the blowing of bubbles in bubble gum or the inflation of a balloon inside a 2-liter soda bottle. In this case, the bottle must have a hole in the side before you inflate the balloon or the pressure of the air inside the bottle will not allow the balloon to inflate.
Once blow molded objects are made or demonstrated, have students examine their characteristics. The most notable characteristic here is that the objects are hollow. Those made in a mold often have seams.
Assessment: Monitor the groups' discussions and view the grading cards from the extruded molded products. Collect and read the students' letters accepting or rejecting the products. You may want to use your school's standard writing rubric to grade the letters. Note whether each group has successfully made an injection molded product and a blow molded product (if these sections were not done as teacher demonstrations). You may want to list the basic characteristics of each manufacturing process on the board with discussion of each to follow in the explanation portion of the lab.
Explanation
At this time, a discussion of the three polymer manufacturing processes and their importance can be initiated. First, students will need to have a basic concept of what polymers are and their role in society before you begin the processing discussion. The long chain structure of the polymers and their physical properties makes them ideal materials for the three processes investigated in this unit.
To aid you in leading this discussion, a brief description of polymers is given below as well as descriptions of the three industrial processes: extrusion, injection molding, and blow molding. There is also a section on packaging consumer goods.
You can find a short video of the three manufacturing processes on the AGPA website by clicking on the thumbnail below:
Polymers
We live in an age of polymers. Although the term polymer may not be a familiar term, polymeric materials make up most of our natural and synthetic environment. Polymers are huge molecules made up of many repeating units. These units or "monomers" are small molecules usually containing ten or less atoms in a row. Carbon and hydrogen are the most common atoms in the monomers. A polymer can be thought of as a chain in which the monomers are linked together to make a chain with at least 1000 atoms in a row. It is the large size of polymers (macromolecules) that give these molecules their special properties. Substances such as rubber, plastics, DNA, hair, cotton, bread, paint, nylon and even cellulose (the supporting structure of plant cells) are made of polymers.
The synthetic or man-made polymers play a major industrial role in our society today. The polymer industry produces more than 10,000 different polymeric products for numerous diverse uses. Many of these products are referred to as plastics. Plastics have been used to replace natural materials in existing products. Their low cost and superior performance as compared to wood, metals, and fabrics have allowed industry to cut manufacturing expenses, improve product performance, and reduce cost to the consumer. Chemists are now learning to design products with specific chemical and physical properties for use in all new applications.
Since polymeric products surround students, they should have a general understanding of how these products are processed in industry to make the objects with which they are familiar. The objective of this module is to aid students in developing an understanding of the relationship between science and technology as well as view science as a human endeavor. The simulation of the plastic manufacturing processes of extrusion, injection molding and blow molding will provide the framework to reach these objectives.
Plastics Processing:
The plastics industry is composed of three divisions. One is the manufacture of resins or the pellets made from starting materials such as crude oil. For example, polyethylene resins are made from "cracking" or breaking the bonds of petroleum molecules to make ethylene gas, C2H2. Under high pressure and temperature, ethylene molecules are joined together in a chain or "polymerized" to form polyethylene. High-density polyethylene (HDPE) contains many straight chain molecules that are thousands of units long. Low-density polyethylene (LDPE) contains side branches of atoms to the parent chain. Both HDPE and LDPE are long-chained molecules composed of carbon and hydrogen atoms.
However, creating a polymer is just the first step in making a useful product. The second division in the polymer industry involves the manufacture of a compound with either plastic or elastometric mixtures. (Elastomers are rubber and rubber-like products.) Here the plastic resins or elastomers produced by the first division are mixed with other ingredients such as pigments, fillers, plasticizers, and other chemicals. The creation of various forms of the mixed compounds allows ease of handling and these include powders, flakes, granules, liquids or in the case of elastomers, slabs or strips for processing by the third division. The processing plant then produces the plastic or elastomer objects for the consumer.
In the case of the plastic compound, it can be either thermoset or thermoplastic. If it is a thermoset type of material, cross-linking takes place while curing and it cannot be reshaped. However, thermoplastic materials can be shaped and reshaped. Elastomers only exist as a thermoset material since cross-linking takes place. Cross-linking refers to the "links" or "bonds" between polymer chains.
Three of the most common plastics processing methods involved in the shaping or molding of plastics are discussed in this unit. They are extrusion, injection molding, and blow molding. They all involve melting the molding compounds by heat and pressure and forcing the melted or softened plastic into a mold or through an opening to shape the object. In the case of the thermoplastic material, the object must be cooled to stop the flow of plastic and to allow the object to harden. This unit deals with thermoplastic compounds. Thermoset plastics and elastomers are mentioned so that you are aware that other forms do exist.
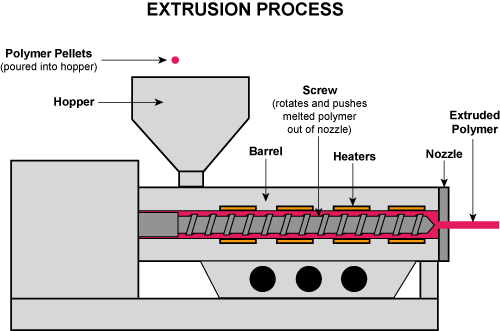
Extrusion:
Extrusion is a process that involves forcing a melted plastic through a "die" or nozzle. Dry plastic powder or granules are subjected to heat and pressure as they go through an extruder. As the plastic melts into a thick viscous material, it is forced through a die or hole in the shape of the finished product. The extruded material then lands on a moving conveyer belt, which carries the plastic into a stream of cool water or air. This allows the manufacturer to continually produce a product with a desired shape. Extruded pieces can then be cut to specific lengths. Examples of extruded products are auto trim, vinyl windows frames, house siding, pipes, tubing, fibers, films (bags, coverings and laminates), and coatings. More examples can be identified if the viewer looks for long, continuous pieces with a consistent cross-sectional shape. These pieces are typically cut to specific lengths so they may also show a sharp cut edge.
An extruder usually consists of a resin feeding hopper, a heated barrel, a constant rotating screw, a screen changer, and a die. Plastic resin is first fed into a funnel-shaped hopper. The hopper feeds the plastic into an opening channel of a screw rotating inside a cylinder. As the screw rotates, the plastic is forced forward by the screw flights (raised edges or threads). As it moves, it is heated, melted, thoroughly mixed, and compressed by the pattern inside the screw's channels. The melt finally passes through the screen to the die. The screen serves mainly as a filter for foreign material in the plastic. The emerging plastic is now formed in the shape of the desired product and allowed to cool. Problems that occur during extrusion include low output rate, dimensional stability, and imperfect edges.
Simple examples of extruders can be also found in the home. Meat grinders and cookie presses extrude meat or cookie dough through a die into a desired shape or size. A toothpaste tube extrudes toothpaste into a continual linear stream of paste.
Injection Molding"
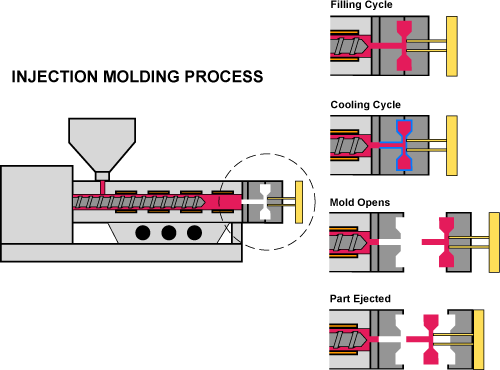
Injection molding is the most important commercial method for transforming thermoplastics into useful products. A thermoplastic polymer is one that can be reheated and reshaped many times. Themoset plastics set in a desired shape and cannot be reheated and remolded. During the injection molding process, plastics are heated until they soften into a molten state. The melted plastic is then forced at high pressure through a nozzle into a cold mold. The plastic cools in the mold and takes on the mold's shape. Once the plastic is cooled, the mold opens and the product is released from the mold. The resulting product often needs no further work before being put into use since details such as ribs and screw threads can be formed during this process. Examples of injection molded items are cabinets for computers, computer screens, and computer keyboards, parts of plastic model or hobby kits, plastic bottle caps, brake and engine parts, reflectors and headlights, circuit breakers, toaster oven panels, power tool and lighting housings, and even tableware. These items can usually be identified by one or more of the following features: side parting lines or seams in an object formed where the two sides of the mold meet together, sharp corners, fine detail and precision, frequent flat areas, and the presence of a "gate". The gate looks like a dimple or bump of plastic. It is the entry point of the polymer melt into the mold cavity. The gate may be centrally located and a significant distance from the parting lines as in a waste basket, on the edge as in individual parts of a plastic model hobby kit, or submarine where the gate itself appears oval and is located below but near the parting lines.
An injection-molding machine is really a combination of three machines: the plasticizing and injection machine, the clamp, and the mold. The purpose of the plasticizing and injection machine is to produce a molten volume of plastic under enough force to cause the plastic to fill the mold cavity. The pressure may be supplied by a plunger (also called a ram or piston) or rotating screw. A hopper feeds the plastic resin into a heated cylinder or chamber while the ram is retracted. The ram then pushes forward rapidly and forces the resin into the cylinder compacting it around a centrally located torpedo or spreader. As the melt moves forward around the cylinder, it becomes more fluid. As the melt arrives at the nozzle, it is pushed rapidly forward and into the mold. (In screw injection molding machines, the screw's turning motion delivers the melted plastic to the mold.) Molds may have only one, or many cavities for a number of parts to be molded simultaneously. When the mold cavities are filled, the plastic is allowed to cool so that an item holds it shape when ejected from the mold. The clamping unit supplies the motion and force to open and close the mold. It must also hold the mold closed with sufficient force to prevent the injection pressure from opening the mold's cavity as it is filled. The molds themselves may vary greatly. They are highly complex structures using various metals and alloys to form their exact finished dimensions. However, all molds contain and guide molten polymers from the nozzle into the cavity, cool the polymer in the cavity to its solid state, and open to discharge the final item. Once an object has been injected from a mold, the machine is ready to fill the mold cavity again and start the process over. Most injection molding machines are automatically timed, and for many thermoplastic materials, it only takes 10 to 30 seconds to complete a cycle. The rapid succession of injection of the molten plastic and ejection of the solid molded object has permitted this process to become the leader in the mass production of plastic toys and household items. Common injection molding problems include shrinkage following the cooling of the plastic from elevated temperatures, warping from non-uniform shrinkage, and mold release problems.
Blow Molding
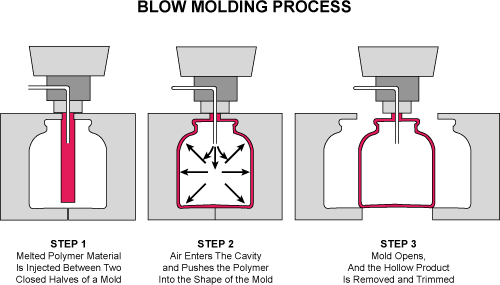
Blow molding technology has been adapted from the glass industry for molding of hollow containers from thermoplastic materials. The most widely known blow molded objects are bottles, jars, cans, and containers of all types for the food, beverage, cosmetic, medical, pharmaceutical, and home products industries. Among other blow molded objects are balls, toys, automobile fuel tanks, and car bumpers. These objects are hollow and thin walled. (Note: Some toys such as the head part of a child's doll, inexpensive kick balls, and huge 100 gallon polyethylene tanks may appear to be blow molded, but are actually made by a process called rotational molding.)
Blow molding consists of three major stages: melting or plasticizing the resin, forming a parison or preform, and inflating the parison or preform in a blowing mold to produce an end product. In the first and second stages, plastic pellets are melted and mixed under heat and pressure to form a tube called a parison or preform. Either extrusion or injection molding is used to form the parison. In the blow molding process, the parison is extruded into a cold mold and inflated with hot air. When the molten plastic touches the sides of the cold mold, it cools and assumes the inside dimensions of the mold. As the preform is heated and while being inflated inside the cold mold, it is mechanically stretched along it vertical axis. Common problems in the blow molding process include production of irregular frosty surfaces and non-uniform wall thickness.
These three industrial processes are not the only way to mold a plastic item. Processes such as calendering, casting, coating, laminating, compression molding, rotational molding, sheet forming, and vacuum forming may also be used. It is not the purpose of this module to go into descriptions of these processes but one must be aware that they exist. It is also not the purpose of this module to give an engineering description of the three described. The explanations are simplified to give the needed background to present information to young audiences such as middle and elementary school students.
Packaging of Consumer Goods:
Packaging in the United States is an $83 billion dollar business! Packages contain a product for shipping or storing a commodity. The consumer is usually unaware of the packaging until a problem occurs. If one cannot easily tear a bag of snack food or there are trashcans filled with the packages of a particular item, or the taste of the packaging is evident in the food, then the public takes notice. Companies have to make many decisions about the packaging of their products and it is not an easy process.
The issues to be considered in the design of a new package are:
The packaging industry employs a variety of personnel including: artists to computer-generate the labels and packages, printing press technicians to transfer the design from the printing cylinders to the paper or polymer label with six to eight different colors, chemists to ensure the solvent recovery of the ink solvents is environmentally safe, polymer engineers to regulate the extruders for laminations and coatings, mechanical engineers to oversee the cutting or slitting of the large rolls into smaller rolls, and quality control engineers to test the product coming from the presses, extruders and slitters. The customers of the packaging industry are those companies that are making a product to sell to the general public.
The changes in packaging over a period of time are subtle and usually go unnoticed by the public. An example is an older method of packaging is waxed paper overlay on boxes of powdered milk and Cracker Jacks�. Most paperboard box containers have the label printed and laminated on the box such as dish washing detergent boxes. The packaging industry is constantly striving to reduce the amount of resources needed to make a package. The market is being flooded with the "stand-up envelopes" now. More and more packaging is converting to extruded films and laminates. Since 1972, 12-ounce aluminum cans have been weight-reduced by over 25%. The coffee packers are now using "brick packs" which represent an 88% reduction in the volume of packaging materials versus metal cans. Since 1980, the glass packaging industry reduced the average weight of a 16-ounce beverage bottle from 255 grams to 177 grams, which is a 31% reduction. Between 1977 and 1990, the amount of plastic in one soda bottle (PETE) has been reduced by 25%. Bags containing chopped lettuce are "breathable" so that gases can be exchanged through the polymer layer. There are "modified atmosphere packages" with carbon dioxide or nitrogen gases surrounding the food. Have you been aware of these changes?
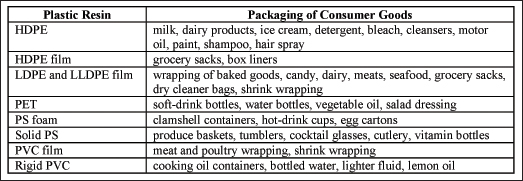
Packaging materials of consumer products account for more than one-third of municipal waste by volume in the United States. Paper makes up about 32.7% of the municipal solid waste generated in the US each year, while plastics make up 12.1% and glass makes up 5.3%. The packaging industry is the largest consumer of plastics using over one-third of all plastic resins used annually. Packaging includes films for flexible packages, films for barrier material on bottles and rigid containers, for soft drink containers, and coatings. The most common resins used are low-density polyethylene (LDPE), high-density polyethylene (HDPE), poly(vinyl chloride) (PVC), poly(ethylene terephthalate) (PETE), and polypropylene (PP). Sixty percent of plastic packaging in the landfills is due to HDPE and LDPE. The following is a table of the plastic resins and the packaging of consumer goods.
How does a grocery store decide if plastic or paper bags should be used? They have to consider the price per bag as well as policy for employing baggers, checkout stand design, extent of double bagging, and wage rates. Here are other issues:
In favor of the use of a paper bag:
In favor of the use of a plastic bag:
Consumers can source reduce too. Here are some ways students could help with our waste problem by source reduction and recycling: (Let your students brainstorm to make a list like this.)
Assessment: Ask students to give example of objects other than toys that may be made from the 3 manufacturing processes. Toothpaste, the plastic molding around window screens, and plastic pipes are extruded. Plastic handles of pots, pans, and toothbrushes, as well as the outer casing of their phones or computers may be injected. Bottles are blow molded. You may have students research the 3 manufacturing processes on the internet and write a short description of each process and give examples of several products made by each process that were not previously mention in class.
You may even want to assign students to teams that will research the issues involved in waste management and packaging. If students are old enough, a paper verses plastic verses cloth debate can be held.
Elaboration
Using the same party favor toys used in the exploration phase, give each of the production teams a bag of different toys. (see attached worksheet). Let the students work in small groups to discuss how they think each toy is made. They have three choices: extrusion like the Polymer Factory Activity, or injection molding like the hot glue shapes, or blow molding like the hot tube in the Fingles�. Caution the students that some toys are made using more than one method! The production manager should remove one toy from the bag at a time and have the team observe its properties and then categorize it on their data sheets. This will alleviate student dumping the bag of toys and simply "playing with them" rather than trying to analyze how they are made. A class discussion will produce different opinions but generally, they should have a much better understanding of these three processes after the preceding activities.
Assessment: Have students generate lists placing each of the toys into one of the three categories based on their manufacturing process: extrusion, injection molding, or blow molding. Make a "master list" on the board or overhead compiling lists from all groups. If different groups disagree about the placement of a given toy, let the groups discuss the reasoning behind their placement and see if the entire class can come to an agreement on a toy's classification. If you choose, you may make any corrections to the class list as needed. However, only do this after a master list has been generated. If corrections need to be made, discuss with students the properties or characteristics they may have missed. (The toy with its processing method is listed in the materials section.)
You may want to give a quiz with ten of these toys in a week or so to see how they have retained their learning.
Students should have basic measurement and communication skills. No other prerequisites are necessary.
NGSS Standards:
Common Core Standards:
National Standards:
Ohio Standards:
Please view the Explanation of this activity located in the Procedures section.
Play Doh� is non-toxic. Homemade dough is non-toxic and water-soluble. Discarded materials can be placed in the classroom waste basket.
Goggles should be worn when working with hot glue guns or heatguns.
The glue guns should be closely supervised or the teacher may choose to do the injection molding as a demonstration. Another option is to have students inject the dough into the molds with their hands to form an object. However, the dough objects do not have the same appeal as the more permanent glue stick ones.
A heat gun gets hot enough to blister paint off walls. It should never be aimed directly at a person or any flammable material. Students must be closely supervised. It is recommended that the activity supervisor be the only person to hold or move the heat gun. Students can hold the plastic tubing in the hot air stream as long as they are closely watched. The long length of the tubing prevents heat from reaching the hands as the tubing is rotated in the hot air stream.
Polymeric products surround us. Many products, from plastic bags, to detergent bottles, to plastic syringes and band-aids affect the quality of our lives. Each of these products must be manufactured to precise standards. Methods of processing, such as extrusion, injection, and blow molding, make use of the unique properties of the polymers they are working with, as well as the cost and availability of raw materials and the time of manufacture to bring a reliable product to the consumer at a reasonable cost.
Give the students a bag of 10 to 15 polymer items that are not toys, and ask students to classify the items based on their method of manufacture. You might include such items as blow molded bottles and jars, injection molded bottle caps, buttons, and pocket combs, and extruded pipes and tubing, weather stripping, adhesive tape and wire insulation.
Grouping Suggestions: If you use the playing card method described in this activity, grouping will be random. However, if you have students with varied ethnic backgrounds and abilities, you may choose to place students in groups with these characteristics in mind.
Pacing/Suggested Time: Completing all sections of this activity will take 6 class periods. It will take 1 period for the engagement, 3 periods for the exploration, 1 period for the explanation, and 1 for the elaboration. If the final assessment is conducted, a 7th period may be needed.
Polymer Extrusion Factory Activity Lab Sheet
Polymer Injection Molding Activity Lab Sheet