Click here to print this page.
Akron Global Polymer Academy Lesson Plans
Forces and Motion - The Downhill Racer
Grades: 6-9
Author: Sandy Van Natta
Source: Downhill Racer taken from OSCI 7-10 Physical Science materials developed in 2005 (I am the original author of this activity. I am re-writing it here because it will be taken off the web in the near future.)
Abstract
Students investigate the motion of a car traveling on an inclined plane and along a flat surface. Students observe the pattern of drops left by the moving car. The changing distances between the successive drops indicate that the car was not traveling at a constant speed. From the drops, students will be able to collect data and graph both the velocity and acceleration of the car.
Objectives
What should students know as a result of this lesson?
- Students will explain/discuss that unbalanced forces cause a change in motion
- Students will be able to interpret a curved line on their distance and time graphs as a change in velocity
- Students will identify gravity as the accelerating force on their car
- Students will be able to define acceleration as a rate of change in speed or velocity
What should the students be able to do as a result of this lesson?
- Students will collect and record distance and time data for a moving toy car
- Students will construct graphs from their data
- Students will be able to describe the motion of their car based upon information in their graphs
Materials
For Getting Ready:
- Plastic pipette, thin stem - one per group
- Scissors
- Metric ruler
- Pliers - for teacher use only
- 4-oz plastic cup - one per group
- Pencil compass or small nail
- Tape
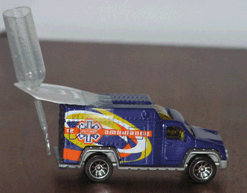
- Small toy car such as Matchbox or Hot Wheels - one per group (a toy truck with a flat bed or a van works best for attaching the dropper)
For the Procedure:
- 1 - 2 meter board to be used as a ramp
- Blocks or books to support the ramp
Narrow track made from one of the following:
- 2 - 4 meter sticks depending on the length of the ramp
- Darda or Hot Wheels car track
- Narrow adding machine tape (1 5/8 inch)
- Tape
- Small toy car with dropper attached (prepared in advance)
- Protractor
- Small cup of water with food coloring added
- Paper towels
- Metric ruler or meter stick
- Graph paper
For the Assessment:
Getting Ready:
Making the Dropper:
- Cut off the stem of a plastic pipette so that the remaining stem is only 5 cm long.
- Using a pair of pliers, grasp the remaining attached stem near the end. Use your other hand to grasp the upper part of the stem. (Do not hold the bulb of the pipette or you may pull the stem completely off the pipette.) Pull firmly on the plastic until it begins to deform and stretch. (This is called necking.) Keep pulling until the end with the pliers breaks off. You will be left with a long thin tube at the end of the pipette stem.
- Cut off some of the narrowed length so that a narrow tip of about 1 cm remains.
- Cut off the rounded top of the bulb of the pipette.
- Place water into the opened bulb. If individual drops leave the end of the stem, you have successfully made a water dropper. If a steady flow of water leaves the pipette, you may need to pull and stretch the plastic out again because your opening is too large.

Making the Dropper Support:
- Cut off the sides of a small plastic cup. Save the rounded bottom. Poke a hole in the edge of the disk with a pencil compass or small nail. The hole needs to be just large enough for you to insert the stem of your dropper.
Attach the Dropper to the Car:
- Insert the stem of the dropper into the small hole. The dropper should be perpendicular to the plastic disk and remain upright.
- Place a tape ring near the back edge of the car. Place the underside of the plastic disk on the tape ring. The dropper stem should now extend slightly behind the car and the dropper should remain upright. Extra tape can be used to secure the dropper assembly if necessary.
Procedures
Engagement
- Hold a toy car in the air and drop it. Ask students what forces act on the car as it falls. Students should realize that gravity is causing the car to fall.
- Drop the car again and ask the students what they would measure to decide if the car was dropping at a constant velocity or if the car was increasing in velocity as it falls. Through the discussion, help the students realize that they would need to measure the distance fallen during several equal time increments to determine this answer. Also mention the difficultly students would have making these measurements since the car falls so rapidly.
- Place the car on a ramp and allow it to roll down the ramp. Ask students to compare the time the car took to roll down the ramp to the time it took for the car to fall. Students should observe that the car took longer to roll down the ramp than to fall.
- Ask students what force was acting on the car to cause it to roll down the ramp. Again, students should identify gravity as the force acting on the car.
- Through discussion introduce the following ideas: When the car is dropped, the entire force of gravity acts in the same direction - straight down - causing the car to reach the ground very quickly. On the ramp, gravity is still acting on the car, but the total amount of force is divided into 2 parts. One component of gravity acts downward (perpendicular to the ramp) and holds the car onto the surface. The other component acts parallel to the ramp and causes to car to travel downward but more slowly than when dropped. Explain that this travel down the ramp can be thought of as a "slow fall".
- With a "slow fall", there is now time to measure the velocity of the object during several time increments.
Assessment: Assessment is informal at this time. Try and involve all students in the discussion. They may wish to include air friction and friction between the car and the ramp as other forces involved in the demonstrations. However, have them concentrate on gravity as the force causing the downward movement of the car.
Exploration
Your task is to describe the motion of a toy car racing down a ramp.
- Construct a ramp with the materials provided by your teacher. To make sure your car runs in a straight line, run Darda� track or parallel meter sticks along the length of the ramp approximately 4 cm apart. This will create a narrow "path" for the car to follow. The meter sticks can be held in place with tape rings. Place a piece of adding machine tape between the meter sticks. This can be secured at either end with a small piece of tape. Release your car on the ramp and make sure it travels easily within the path created.
- Experiment to determine about what angle you will need to keep the car on the ramp for at least 2 seconds. Use a protractor to measure the angle between the ramp and the floor. Record this information in your data table.
- Assign a member of the group to do each of the following tasks:
- Water Dropper Filler and Car Holder - fills the water dropper with colored water then places the car at the top of the ramp.
- Distance Measurer - measures the distance between drops left behind on the paper.
- Recorder - records the Measurer's findings
- Technician - responsible for getting out and putting away all equipment. Also responsible for cleaning up any water drops left behind on the ramp or the floor.
- Fill the water dropper 1/2 full with colored water. Observe drops falling from the end of the dropper. If they are not falling at a regular rate, hold an absorbent paper towel on the narrow end of the dropper. Water will be attracted to the towel and this will cause the drops to start moving through the dropper. Since the drops are falling at a uniform rate, it is not necessary to know how many drops are falling per second. We will treat the timing of each drop as one "time unit" or tu
- Hold your finger over the end of the dropper until you are ready to place your car at the end of the ramp. Position the car so that its dropper is even with the top of the ramp. A large "puddle" will form as drops move through the dropper. Release the car. Make sure not to give any extra push to the car when it is released. You may stop the car and empty the dropper once it has reached the flat floor surface.
- Observe the pattern made by the drops of water on the ramp. The first drop on the paper is the "zero" mark. Measure the distances between the zero mark and the next drop on the paper. That is the distance covered in the first time unit. Measure and record the distances from the zero mark to each of the rest of the drops. Note: the number of drops you have will depend on the length of your ramp. Don't worry if you have fewer drops than indicated in the data table. Record this information in your data table. Use this data to make a graph of position verses time. Draw the best fit line or curve to fit your data. (Distance is on the Y axis and time on the X axis.)
Calculate the average velocity of your car (in cm/tu) for the entire run using the formula Vavg = total distance covered/total time. Record this in your data table. Now look at your graph. You have an average velocity for the entire run but, do you think the car traveled at the same velocity the entire time? Use information from your graph to support your conclusion.
Optional - for older students with good math skills.
- Using the data you collected, find the distance covered in each interval by subtracting each distance measurement from the one following it. For example: if your distances are 0 cm, 16 cm, and 36 cm - subtract 0 cm from 16 cm to get your first distance of 16 cm. Subtract 16 cm from 36 cm to get your second distance of 20 cm. Fill your data into the chart provided.
- ind the average velocity for each time unit by dividing the distance covered in each time unit (cm) by the time unit (tu). Remember each tu has a value of 1. Record your calculations.
- Graph your average velocities verses the time on a new graph. (Average velocity should be on the Y axis and time on the X axis.) Since the average velocity is usually only reached for an instant during the middle of a time interval, you should plot your data at the midpoint of each time interval. (For each time period where there is a changing velocity, an object starts out with one velocity and ends with another. Assuming that the rate of change is constant during that time interval, the average velocity should be reached in the middle of the interval.) Draw a best fit line through your data points.
- You can now find the actual rate of change in velocity (acceleration) of your car by finding the slope of the line on your graph. Slope can be computed by using the formula:
- Slope = change in the Y value/change in the X value
Calculate the slope (acceleration) in cm/tu2 of your car and enter it in the data table.
Assessment: See that students are following proper laboratory procedures. Monitor the groups and make sure they are recording all their observations and data.
Explanation
Begin by having students report their findings. Discuss the student's observations and graphs. Help students gain the following understanding. When a car is on a ramp, a component or part of the force of gravity acts parallel to the ramp, causing the car to speed up, or accelerate down the ramp. This acceleration is not as great as when the car falls straight down since part of the gravitational force is also holding the car against the ramp.
Velocity can be defined as the distance an object travels per unit time or its rate of change in position. It is expressed in units such as km/hr, m/sec, cm/sec, and so on. In most cases, moving objects do not travel at a constant speed. Unbalanced forces can cause a change in speed. The change in speed is known as acceleration. (acceleration avg = change in velocity/time) Acceleration can be expressed in units such as km/hr2, m/s2, and cm/sec2. These units represent a change in velocity per time unit.
Initially students will plot a position- time graph. In this graph, position is plotted vertically and the time horizontally. The slope of the line joining any two adjacent points is the average velocity for that time interval. However, when data from all the points in the experiment is graphed, students will see a curve rather than a straight line. Although they can compute the average velocity for the entire run, they can see that the average velocities for the individual time units are not the same.
Forces cause objects to accelerate or decelerate. In this activity, a car accelerates as it travels down a ramp. When students first observed their water drops on the ramp, they saw that they are not evenly spaced. The car covered greater and greater distances in each time interval. This is reflected in the increasing spaces between the drops. Students should now be able to conclude that the car was speeding up or accelerating.
To further develop the concept of acceleration and allow students to actually compute the acceleration of their car, the Optional Section of this lab can be performed. You can plot velocity verses time much as you previously plotted distance verses time.
The velocities are average velocities taken from their data table for 1 time unit intervals. Since they are average velocities they are plotted at the midpoints of the intervals. This time, a straight line (allowing for experimental error) is obtained and the slope can be computed. The value of the slope is the actual acceleration of the car. Due to irregularities in the ramp surface, construction of the toy car, friction between the car and the guiding meter sticks on the ramp, data points will not be in a perfectly straight line. That is why a "best fit" line is drawn between the data points.
Assessment: Collect and evaluate the student's data sheets.
Elaboration
Students can be asked to design an experiment to determine one of the following: how the height of the ramp affects the acceleration of the car OR how a change in acceleration affects how far the car will travel when it leaves the ramp. They should record the procedure they have designed and set up the needed data table. This can be shown the teacher for approval. Once approval is obtained, students should conduct their experiment, record their data, and graph their results.
Assessment: Students should them write a report in which they draw conclusions from their experiment and support the conclusions with their data.
Prerequisites
Students should already have experience with graphing distance and time values for a moving object. They should be aware that unbalanced forces cause changes in motion and that gravity is a force that causes objects to fall toward the ground.
Best Teaching Practices
- Learning Cycle
- Hands-on/Minds-on Learning
- Inquiry
- Discussion
Alignment with Standards
NGSS Standards:
- MS-PS2-2 Plan an investigation to provide evidence that the change in an object's motion depends on the sum of the forces on the object and the mass of the object.
- MS-PS3-1 Construct and interpret graphical displays of data to describe the relationships of kinetic energy to the mass of an object and to the speed of an object.
Common Core Standards:
- RST.6-8.1 Cite specific textual evidence to support analysis of science and technical texts.
- RST.6-8.3 Follow preciesly a multistep procedure when carrying our experiments, taking measurements, or performing technical tasks.
- WHST.6-8.2 Write informative/explanatory texts, including the narration of historical events, scientific procedures/experiments, or technical processes.
National Standards:
- Content Standard A: 5-8 Science as Inquiry
- Content Standard B: 5-8 Physical Science
Ohio Standards:
- Grades 6-8 Physical Science Benchmark B
- Grades 9-10 Physical Science Benchmark D
- Grades 9-10 Scientific Inquiry Benchmark A
- Grades 6-8 Scientific Inquiry Benchmark A
- Grades 6-8 Scientific Inquiry Benchmark B
Content Knowledge
See as prerequisites as well as the following: A change in motion means that an object can not be standing still or moving at a constant velocity in a straight line. A component of gravity causes a toy car to roll down a ramp with increasing velocity. Evidence for this change in velocity can be seen in the pattern of drops left behind by the car. The change in velocity is known as acceleration. The motion of the car can be represented by a curved line on a distance vs. time graph and as a straight line with an upward slant on a velocity vs. time graph. /p>
Safety
- No special safety or disposal procedures are required
Applications
Any time an unbalanced force is applied to an object, a change in its state of rest or motion occurs. Students experience these changes while skating, riding a bike, sitting in a moving car, etc. As a moving object speeds up or slows down, it covers differing amounts of distance in equal time intervals.
Assessment
Have students with stopwatches position themselves at 1 m intervals. From a standing start have one student volunteer to race past them. Have the students make a data table of the times and distances and calculate the acceleration of the runner. Hold a class discussion about the importance of acceleration in different sports. Is acceleration more important to a sprinter or a long-distance runner?
Have students research and write reports on the acceleration of various objects such as race cars, family cars, and the space shuttle.
Other Considerations
Grouping Suggestions Try to place students with varying abilities and backgrounds in each group. A student with strong mathematical skills can aid weaker members of his/her group.
Pacing/Suggested Time: The construction of the dropper cars will take the teacher about 20 minutes to complete. The engagement and exploration activities should take about 45 minutes to complete. The graphing and discussion may need an additional 20 minutes.
Printable PDF Worksheets
Forces and Motion - The Downhill Racer